Wednesday, December 19, 2012

AVRDUDE GUI

avrdude-gui is a simple GUI for avrdude (http://savannah.nongnu.org/projects/avrdude) which is a command line tool running on several OS to program the Atmel AVR Microcontrollers.

Click here to download it

Friday, April 27, 2012

How to edit System Path Variables

PATH is an environment variable on Unix-like operating systems, DOS, OS/2, and Microsoft Windows, specifying a set of directories where executable programs are located. In general, each executing process or user session has its own PATH setting.

Many programs do not appear in the path as they are not designed to be executed from a command window, but rather from a Graphical User Interface.

Set the PATH environment variable if you want to be able to conveniently run the executable from any directory without having to type the full path of the command. If you do not set the PATH variable, you need to specify the full path to the executable every time you run it. So if you want to change the system path for your applications follow the steps.

NOTE: The PATH environment variable is a series of directories separated by semicolons (;)

How to edit System PATH Variables: 

Windows 7:
  1. From the desktop, right click the Computer icon.
  2. Choose Properties from the context menu.
  3. Click the Advanced system settings link in the upper-left corner.
  4. Click Environment Variables. In the section System Variables, find the PATH environment variable and select it. Click Edit.
  5. In the Edit System Variable window, specify the value of the PATH environment variable. Click OK. Close all remaining windows by clicking OK. 

Windows XP:
  1. Select Start, select Control Panel. double click System, and select the Advanced tab.
  2. Click Environment Variables. In the section System Variables, find the PATH environment variable and select it. Click Edit
  3. In the Edit System Variable window, specify the value of the PATH environment variable. Click OK. Close all remaining windows by clicking OK.
Windows Vista:
  1. From the desktop, right click the My Computer icon.
  2. Choose Properties from the context menu.
  3. Click the Advanced tab (Advanced system settings link in Vista).
  4. Click Environment Variables. In the section System Variables, find the PATH environment variable and select it. Click Edit.
  5. In the Edit System Variable window, specify the value of the PATH environment variable. Click OK. Close all remaining windows by clicking OK.
IMPORTANT: Never forget to put a semicolon at the end, whenever you are changing the value of PATH varibles.

How to configure Code::Blocks for OpenCV 2.3

So many of us always face problems in configuring OpenCV with Code::Blocks, I am also not an exception. I faced a lot of problems in configuring Code::Blocks for OpenCV 2.3. So here is the way how I sorted out this problem.


Requirements:
  1. Code::Blocks with Mingw compiler.
Download the latest release of the Code::Blocks from it's official website.
or
Click the link below to download Code::Block (version 10.05) with MingW compiler from
     
     2. OpenCV (I am using OpenCV 2.3.0), if you don't have it you can get it by clicking the link below
or 
you can select the latest version of the OpenCV on the  
     3. CMake file for creating the binaries for OpenCV, which can be downloaded here


Steps to configure Code::Blocks for OpenCV 2.3.0: 

1. Install the Code::Blocks with Mingw compiler. It will install the required C compiler, C++ compiler and mingw32-make in "C:\Program Files\CodeBlocks\Mingw\bin".

2. Add "C:\Program Files\CodeBlocks\Mingw\bin"in the system path. Check this LINK to see how to edit system path.

3. Install Cmake 2.8. It may ask to add the Cmake to system path variable. If so, select "Do not add to system path variable".

4. Extract "OpenCV-2.3.0-win-src" to "C:\". This will create a new folder "C:\OpenCV-2.3.0".

5. Run Cmake (cmake-gui).

6. Set the Source Code to "C:\OpenCV-2.3.0".

7. Set where to built the binaries. For eg: "C:\OpenCV".


8. Press Configure.

9. Let Cmake create the new folder.

10. Specify the Generator: MinGW Makefiles.

11. Select "Specify native compiler"  and click Next.

12. For C set: "C:/Program Files/CodeBlocks/MinGW/bin/gcc.exe".

13. For C++ set: "C:/Program Files/CodeBlocks/MinGW/bin/g++.exe".

14. Click Finish. There should not be any errors and the screen should look like this


15. In the configuration screen type in "RELEASE" (or "DEBUG" if you want to build a debug version) for "CMAKE_BUILD_TYPE". Select BUILD_EXAMPLES if you want.

16. Click Configure again then click Generate cnd close Cmake.

17. Go to the command prompt and inside the folder "C:\OpenCV" type "mingw32-make" and hit enter (takes about 5 to 10 minutes).

18. Then type "mingw32-make install" and hit Enter.

19. After the installation is completed close the command prompt and copy the include  folder from "C:\OpenCV\install"  directory into "C:\OpenCV" folder and let it replace the previously existing include folder in the directory.

20. Open Code::Blocks and now click on the Settings menu on the menu bar and goto "Compiler and Debugger" settings.

21. Click on the "Linker" tab and "Add" all the files from the folder "C:\OpenCV\lib".


22. Click on the "Search Directory" tab and under "compiler" tab "Add" the path "C:\OpenCV\include" and "C:\OpenCV\include\opencv"


23. Now click on the "linker" and "Add" the path "C:\OpenCV\lib" and hit "OK".


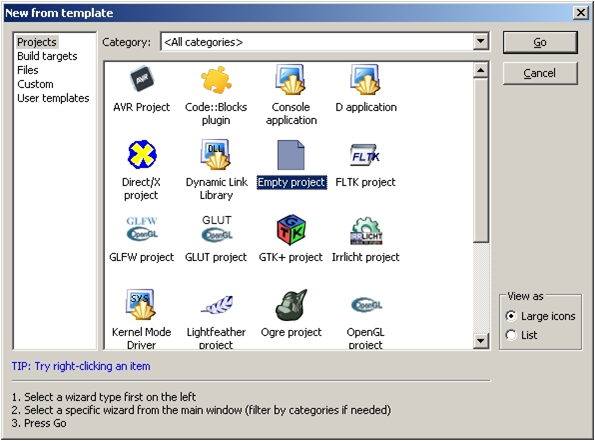
24. Create a new Project. Check "How to create a new project in Code::Blocks".

25. Try to run the following code. This code will load an image of the name "Paris.jpg" onto the screen. You can change the name "Paris.jpg" with your own image name. (Don't forget to putthat image into your project folder).
////////////////////////////////////////////////////////////////////////

#include "stdlib.h"
#include "stdio.h"
#include "math.h"
#include "cv.h"
#include "highgui.h"


int main(int argc, char *argv[])
{
// declare a new IplImage pointer
IplImage* myimage;

// load an image
myimage = cvLoadImage("Paris.jpg",1); //change the file name with your own image

//create a new window & display the image
cvNamedWindow("Smile", CV_WINDOW_AUTOSIZE);
//cvMoveWindow("Smile", 100, 100);
cvShowImage("Smile", myimage);

//wait for key to close the window
cvWaitKey(0);
cvDestroyWindow( "Smile" );
cvReleaseImage( &myimage );
return 0;
}

////////////////////////////////////////////////////////////////////////////

Saturday, March 17, 2012

Receive string through UART

In this tutorial I am going to show you how to receive a string through UART. In this program we are going to make use of the previous function which were written for receiving the character through UART. Don't forget to put NULL character at the end of the string.....
#include<avr/io.h>

void UART1_Init()
{
//set baud rate = 9600 bps
UBRR1H = 0x00;
UBRR1L = 103;         //0x67

//set 1 stop bit, no parity bit and 8 bit charachter size
UCSR1C = 0x06;         //(1 << UCSZ1)|(1 << UCSZ0)  

//enable transmission and reception
UCSR1B = 0x18;         //(1 << RXEN)|(1 << TXEN)
}

//Transmit character through UART
void UART1_Tx_Char(unsigned char data)
{

//put the data to be transmitted into the UDR register
UDR1 = data;

//wait until the transmission is completed
 while(!(UCSR1A&(1<<UDRE)));
}


//Transmit string through UART
void UART1_Tx_Str(unsigned char * str)
{

while(*str)
{
UDR1 = *str++;
while(!(UCSR1A&(1<<UDRE);

}

//Receive a character through UART
unsigned char UART1_Rx_Char()
{
//wait for the charater
while(!(UCSR1A & (1<<RXC)));

//return the received charater
return(UDR1);
}

//Receive string through UART
unsigned char * UART1_Rx_Str()
{
 unsigned char string[20], x, i = 0;

//receive the characters until ENTER is pressed (ASCII for ENTER = 13)
while((x = UART1_Rx_Char()) != 13)
{
 //and store the received characters into the array string[] one-by-one
string[i++] = x;
}

//insert NULL to terminate the string
string[i] = '\0';

//return the received string
return(string);
}

void main()
{
//initialize the UART circuitry
UART1_Init();

//Transmit the Received string onto the UART again
UART1_Tx_Str( UART1_Rx_Str());
}

Receive Character Through UART

In this tutorial we are going to receive a single character through UART and display that character over PORTC, to which we can connect the LEDs.
(these codes have been written for ATmega128 micro-controller which has two UART circuitry, UART0 & UART1, the same code can be used with other AVR micro-controllers with some minor changes)
#include < avr/io.h >

//Initialize UART circuitry
void UART1_Init()
{
//set the baud rate as 9600 bits per second
UBRR1H = 0x00;
UBRR1L = 0x67; //or 103 in decimal

//set character size as 8-bit, no parity bit, one stop bit
UCSR1C = 0x06 // (1 << UCSZ1)|(1 << UCSZ0);

//enable reception and transmission
UCSR1B = 0x18 // (1 << RXEN)|(1 << TXEN);
}

void main(){
//define PORTC as an output port to display received char
DDRC = 0xFF;

//initialize UART circuitry

 UART1_Init();

//wait for the reception to be completed
while(! (UCSR1A & (1 << RXC)));

//display the received character on PORTC
PORTC = UDR1;
}

Thursday, March 15, 2012

Transmit Character Through UART

In this tutorial I am going to show you how to transmit a character through UART. First of all we have to initialize the UART circuitry of our micro-controller by providing proper values to the UART registers in AVR. There are basically 5 registers for UART....
(these codes have been written for ATmega128 micro-controller which has two UART circuitry, UART0 & UART1, the same code can be used with other AVR micro-controllers with some minor changes)

*********************************************************************************
Transmit a Character Through UART
*********************************************************************************

//Include AVR Header file
 #include < avr/io.h >
 
//Initialize UART circuitry
void UART1_Init()
{
     //set the baud rate as 9600 bits per second
     UBRR1H = 0x00;
     UBRR1L = 0x67;     //or 103 in decimal
     
     //set character size as 8-bit, no parity bit, one stop bit 
     UCSR1C = 0x06     // (1 << UCSZ1)|(1 << UCSZ0);
     
     //enable reception and transmission
     UCSR1B = 0x18     // (1 << RXEN)|(1 << TXEN);


//Start main function
void main()
{
   
     UART1_Init();
     
     //put the desired character in UDR register
     UDR1 = '@';

     //wait for the transmission to be completed
     while(! (UCSR1A & (1 << UDRE)));
}

Friday, March 9, 2012

Transmit String Through UART

In this tutorial i am going to show you how to transmit a string through UART. For that you first have to initialize the UART circuitry in your micro-controller. For initializing we have to update UART registers in AVR. There are basically 5 registers for UART in AVR....

1. UBRR register for setting up the baud rate for the transmission. Its a 16 bit value and the AVR is an 8 bit micro-controller, so this 16 bit value is stored in two 8 bit registers (UBRRnL and UBRRnH)
2 And 3 control registers (UCSRnA, UCSRnB and UCSRnC).
3. ATmega 128 is having 2 UART ciruitry (UART0 and UART1) and for each circuitry we are having different registers, for ex: UBRR1L for UART1 and UBRR0L for UART0.

(these codes have been written for ATmega128 micro-controller which has two UART circuitry, UART0 & UART1, the same code can be used with other AVR micro-controllers with some minor changes)

#include <avr/io.h>

void UART1_Init()

{
//set baud rate = 9600 bps
UBRR1H = 0x00;
UBRR1L = 103;        //0x67

//set 1 stop bit, no parity bit and 8 bit charachter size
UCSR1C = 0x06;         //(1<<UCSZ1)|(1<<UCSZ0)

//enable transmission and reception
UCSR1B = 0x18;         //(1<<RXEN)|(1<<TXEN)
}

void main()
{
int i=0;

//define the string to be transmitted
char string[] = "MoMos lOveRs";

while(string[i] != '\0')

{
//transmit the string by putting characters into UDR one by one
UDR1 = string[i++];

//wait until UDR is empty to take new byte
while(!(UCSR1A & (1<<UDRE)));
}

//send the NULL character
UDR1 = '\0';

//wait until UDR is empty to take new byte
while(!(UCSR1A & (1<<UDRE)));
}

Generating LED Patterns


In this tutorial i am going to show you, how to generate some pattern using LEDs. The micro controller is ATmega128 and the 8 LEDs are connected to the PORTC of the micro controller.
The code is written in such a way that first the LEDs will be glowing  in Right-to-Left fashion and then from Left-to-Right fashion and will continue for ever.


*********************************************************************************
Generating LED Pattern
*********************************************************************************

//Include AVR Header file
 #include < avr/io.h >
 
//Include DELAY Header file
#include < util/delay.h >

//Start main function
void main()
{
   
     int i = 0;

     //Set a particular port as output
     DDRC = 0xFF;            //PORTC output
 
     //infinite loop
     while(1)              
     {
          //Loop 8 times from Right to Left  
         while( i < 8)      
         {
              //setting 1 bit at a time in PORTC
              PORTC = (1 << i++);     

             //apply 100 ms delay
             _delay_ms(100);

         }
          //Loop 8 times from Left to Right  
         while( i )      
         {

              //setting 1 bit at a time in PORTC
              PORTC = (1 << --i);     

             //apply 100 ms delay
             _delay_ms(100);

         }  
     }
}

Thursday, March 1, 2012

Blinking LEDs

In this tutorial I am going to show you, how to blink LEDs using AVR micro controller. I am using ATmega128/ ATmega64 (both of the micro controller can be used interchangeably as they differ in the size of flash memory only). The 8 LEDs which I am going to blink/toggle are connected to PORTC of the micro  controller and they will toggle after 100 ms. So let's start with it............

*********************************************************************************
Blinking LEDs
*********************************************************************************

//Include AVR Header file
 #include"avr/io.h"
 
//Include DELAY Header file
#include"util/delay.h" 

//Start main function
void main()
{
   
     //Set a particular port as input or output
     DDRC = 0xFF;            //PORTC output
 
     //infinite loop
     while(1)              
     {
          //set all the pins of PORTC to 1  
         PORTC = 0xFF;      
 
          //apply 100 ms delay
         _delay_ms(100);        

         //set all the pins of PORTC to 0  
         PORTC = 0x00;            

         //apply 100 ms delay
         _delay_ms(100);      
     }
}

Wednesday, February 29, 2012

Download WinAVR

WinAVR (pronounced "whenever") is a suite of executable, open source software development tools for the Atmel AVR series of RISC microprocessors hosted on the Windows platform. WinAVR includes the GNU GCC compiler for C and C++.

WinAVR contains all the tools for developing on the AVR. This includes avr-gcc (compiler), avrdude (programmer), avr-gdb (debugger), and more! WinAVR is used all over the world from hobbyists sitting in their damp basements, to schools, to commercial projects.

WinAVR is designed for: WinXP, Vista (34 bit & 64 bit), 7 (32 bit & 64 bit) 

You can download the latest WinAVR software from the sourceforge website


or 

You can download WinAVR-20100110 directly by clicking the link below:

Sunday, February 26, 2012

How to configure Code::Blocks for SDL


To configure Code::Blocks to be used with SDL, follow these steps:


1. If you don't have the Code::Blocks, download the 10.05 version of it with MingW compiler from the link below. 


2. Download SDL headers and binaries (version 1.2.15 for windows) click on the link below and extract them in to your C drive.


3. Install Code::Blocks.

4. Start the Code::Blocks and go to "Compiler and debugger" in "Settings" menu.


5. Go to "Compiler" tab under "Search directory" and click "Add".

 
6. A window will pop-up and in this window click the browse button. 


7. And browse for the "include" folder inside SDL folder which you have extracted in C and hit "OK". By doing so, we are providing the compiler with the path of all the header files which are written for SDL libraries. And now we can include any of the header file, which are present inside this include folder, into our main program.


 8.you will see this window.


9. Now click on the "Linker" tab under "Search directory" and "Add" the path for the linking libraries as follows


10. Now browse for the "lib" folder inside SDL folder which you have extracted in C drive, as shown


11. Hit "OK". Create a new project (File/New/Project..)


12. Give this project a name and select the storage location for your project files. On the next window click "Finish" to create a new project with the specified name.


13. After clicking "Finish" on the next window, your folder which will be storing your all project files will be created. Now all the files which may be required by your program (which you will be writing) must be kept inside this folder.

14. Next do these settings to prevent console window to appear during execution of your program. Go to "Properties" in "Project" menu.


and select the "GUI application"


15. Now go to the "Compiler and debugger" settings menu again and in "Linker Settings" type:

-lmingw32 -lSDLmain -lSDL
under "other linker options".


16. Now your compiler is fully configured to work with SDL.

17. Now as you will be working with SDL, it's DLL files (SDL.dll) will be required by your compiler to execute your program. So you need put those DLL files inside your Folder, which you have just created in step no. 13. You will find these DLL files in C:/SDL/bin. Copy SDL.dll and put it inside your project folder folder_name/bin/debug (created in step 13).

NOTE: This bin/debug folder will be created after you will write your first program and try to run it, running the program will give you an error and then you need to put this DLL file in bin/debug folder inside your project folder.

NOW YOU ARE ALL SET TO ROCK WITH SDL. ENJOY PROGRAMMING WITH SDL :)
A brief description of DLL:

"A Dynamic Link Library (DLL) is a file of code containing functions that can be called from other executable code (either an application or another DLL). Programmers use DLLs to provide code that they can reuse and to parcel out distinct jobs. Unlike an executable (EXE) file, a DLL cannot be directly run. DLLs must be called from other code that is already executing."

To know more about DLL click on the link below:

SDL Header and Binaries-1.2.15

To work with SDL libraries you should have all the binary and header files downloaded in to your Computer. Here is the link from where you can download these header files and binary files for different platforms such as Windows , Linux etc. 


or

Download SDL-1.2.15 with MingW for windows directly by clicking on the link below

Download the compressed folder and extract it in to your 'C' drive. That's it. You are done with SDL installation. Now you just need to configure your IDE (I am using Code::Blocks) to work with SDL and that's all. Enjoy GAMING :).

To configure Code::Blocks to work with SDL check out: How to configure Code::Blocks for SDL

Download SDL Games

 Simple Direct media Layer (SDL) libraries are being used worldwide to develop exciting Games, such as Tetris, Arcanoid, 2H4U and many more...

These games are available free online and therefore I am here providing a link to download these games directly from the official website of SDL.  

Click the link below to go to the website from where you can select among more than 600 games.

Arcade and game-console emulators which use SDL

Here is the list of some of the Arcade and game console emulators which were developed using SDL.
  • DGen – an emulator for Sega Genesis (Mega Drive).
  • FCE Ultra – an emulator of Nintendo Entertainment System (NES) and the Famicom Disk System.
  • Gens – a Sega Genesis emulator.
  • Hatari – an emulator of the Atari ST computer system.
  • MAMESDLMAME is an SDL-based port of MAME (MAME is an "Multiple Arcade Machine Emulator" emulator).
  • Mednafen – multi-system emulator supporting Atari Lynx, Game Boy (including Color and Advance revisions), Neo Geo Pocket, Neo Geo Pocket Color, Nintendo Entertainment System (NES), PC Engine, SuperGrafx, PC-FX, WonderSwan, and WonderSwan Color.
  • Mupen64 – Mupen64 (Multi Platform Emulator for the N64) is an emulator for the Nintendo 64.
  • NeoCD – a Neo Geo CD emulator.
  • Stella – an emulator for the Atari 2600.
  • VisualBoyAdvance (VBA) – emulator for the Game Boy, Super Game Boy, Game Boy Color, and Game Boy Advance handheld game consoles sold by Nintendo.
  • Yabause – an emulator for the Sega Saturn.
  • ZSNES – an emulator of the Super Famicom and SNES video game systems.

Gaming engines which use SDL

Here is the list of some of the Gaming Engines developed using SDL Libraries.

Code::Blocks


Code::Blocks is a free, open source and cross platform IDE. This IDE can be used to program on Linux, Mac or Windows. It supports multiple compilers including GCC (MingW, GNU GCC). Attractive interface, easy to program.

Currently, Code::Blocks is oriented towards C and C++. It can also be used for creating AVR, ARM, D, DirectX, MATLAB, OpenGL, Qt, SDL  Projects and many more.

You should go for Code::Blocks with MingW compiler. Check it out what makes MingW best suited as a compiler.

Download the latest release of the Code::Blocks from it's official website.

or

Click the link below to download Code::Block (version 10.05) with MingW compiler

Saturday, February 25, 2012

SDL Introduction


Simple DirectMedia Layer (SDL) is a cross-platform, free and open source multimedia library written in C that presents a simple interface to various platforms' graphics, sound, and input devices.

SDL has the word "layer" in its title because it is actually a wrapper around operating-system-specific functions. The main purpose of SDL is to provide a common framework for accessing these functions. For further functionality beyond this goal, many libraries have been created to work on top of SDL.

Software developers use it to write computer games or other multimedia applications that can run on many operating systems including Android, AmigaOS, AmigaOS 4, FreeBSD, BeOS/Haiku, iOS, Linux, Mac OS 9, Mac OS X, MorphOS, OpenVMS, PlayStation Portable, Syllable, Symbian, webOS, and Windows. It manages video, events, digital audio, CD-ROM, sound, threads, shared object loading, networking and timers. 

SDL itself is very simple; it merely acts as a thin, cross-platform wrapper, providing support for 2D pixel operations, sound, file access, event handling, timing, threading, and more. It is often used to complement OpenGL by setting up the graphical output and providing mouse and keyboard input, which are beyond the scope of OpenGL.

The library is divided into several subsystems, namely the video (handles both surface functions and OpenGL), audio, CD-ROM, joystick, and timer subsystems. Besides this basic, low-level support, there also are a few separate official libraries that provide some more functions. These comprise the "standard library", and are provided on the official website and included in the official documentation:
  • SDL_image — support for multiple image formats
  • SDL_mixer — complex audio functions, mainly for sound mixing
  • SDL_ttf — TrueType font rendering support
  • SDL_rtf — simple Rich Text Format rendering
  • SDL_net — networking support
Other, non-standard libraries also exist. For example: SDL_Collide.


Friday, February 24, 2012

My First Robot

I was always interested in making something which i could say yeah i have done it. It was started with the robotics workshop i attended in march 2009. After that i was really into robotics. I tried and failed and then tried. At last i was successful in making this robot. Its a wireless robot designed by my team and programmed by me......hehehehehe.... that was  the most interesting thing coz this is the very first robot which was completely programmed and designed by us, that made us feel proud.......

This is how our first robot look like......

Internal view of our robot

Top View

Lateral View

Front view

 
Design by Free WordPress Themes | Bloggerized by Lasantha - Premium Blogger Themes | Affiliate Network Reviews