Showing posts with label Techie Zone. Show all posts

Friday, April 27, 2012

How to edit System Path Variables

PATH is an environment variable on Unix-like operating systems, DOS, OS/2, and Microsoft Windows, specifying a set of directories where executable programs are located. In general, each executing process or user session has its own PATH setting.

Many programs do not appear in the path as they are not designed to be executed from a command window, but rather from a Graphical User Interface.

Set the PATH environment variable if you want to be able to conveniently run the executable from any directory without having to type the full path of the command. If you do not set the PATH variable, you need to specify the full path to the executable every time you run it. So if you want to change the system path for your applications follow the steps.

NOTE: The PATH environment variable is a series of directories separated by semicolons (;)

How to edit System PATH Variables: 

Windows 7:
  1. From the desktop, right click the Computer icon.
  2. Choose Properties from the context menu.
  3. Click the Advanced system settings link in the upper-left corner.
  4. Click Environment Variables. In the section System Variables, find the PATH environment variable and select it. Click Edit.
  5. In the Edit System Variable window, specify the value of the PATH environment variable. Click OK. Close all remaining windows by clicking OK. 

Windows XP:
  1. Select Start, select Control Panel. double click System, and select the Advanced tab.
  2. Click Environment Variables. In the section System Variables, find the PATH environment variable and select it. Click Edit. 
  3. In the Edit System Variable window, specify the value of the PATH environment variable. Click OK. Close all remaining windows by clicking OK.
Windows Vista:
  1. From the desktop, right click the My Computer icon.
  2. Choose Properties from the context menu.
  3. Click the Advanced tab (Advanced system settings link in Vista).
  4. Click Environment Variables. In the section System Variables, find the PATH environment variable and select it. Click Edit.
  5. In the Edit System Variable window, specify the value of the PATH environment variable. Click OK. Close all remaining windows by clicking OK.
IMPORTANT: Never forget to put a semicolon at the end, whenever you are changing the value of PATH varibles.

How to configure Code::Blocks for OpenCV 2.3

So many of us always face problems in configuring OpenCV with Code::Blocks, I am also not an exception. I faced a lot of problems in configuring Code::Blocks for OpenCV 2.3. So here is the way how I sorted out this problem.


Requirements:
  1. Code::Blocks with Mingw compiler.
Download the latest release of the Code::Blocks from it's official website.
or
Click the link below to download Code::Block (version 10.05) with MingW compiler from
     
     2. OpenCV (I am using OpenCV 2.3.0), if you don't have it you can get it by clicking the link below
or 
you can select the latest version of the OpenCV on the  
     3. CMake file for creating the binaries for OpenCV, which can be downloaded here


Steps to configure Code::Blocks for OpenCV 2.3.0: 

1. Install the Code::Blocks with Mingw compiler. It will install the required C compiler, C++ compiler and mingw32-make in "C:\Program Files\CodeBlocks\Mingw\bin".

2. Add "C:\Program Files\CodeBlocks\Mingw\bin"in the system path. Check this LINK to see how to edit system path.

3. Install Cmake 2.8. It may ask to add the Cmake to system path variable. If so, select "Do not add to system path variable".

4. Extract "OpenCV-2.3.0-win-src" to "C:\". This will create a new folder "C:\OpenCV-2.3.0".

5. Run Cmake (cmake-gui).

6. Set the Source Code to "C:\OpenCV-2.3.0".

7. Set where to built the binaries. For eg: "C:\OpenCV".


8. Press Configure.

9. Let Cmake create the new folder.

10. Specify the Generator: MinGW Makefiles.

11. Select "Specify native compiler"  and click Next.

12. For C set: "C:/Program Files/CodeBlocks/MinGW/bin/gcc.exe".

13. For C++ set: "C:/Program Files/CodeBlocks/MinGW/bin/g++.exe".

14. Click Finish. There should not be any errors and the screen should look like this


15. In the configuration screen type in "RELEASE" (or "DEBUG" if you want to build a debug version) for "CMAKE_BUILD_TYPE". Select BUILD_EXAMPLES if you want.

16. Click Configure again then click Generate cnd close Cmake.

17. Go to the command prompt and inside the folder "C:\OpenCV" type "mingw32-make" and hit enter (takes about 5 to 10 minutes).

18. Then type "mingw32-make install" and hit Enter.

19. After the installation is completed close the command prompt and copy the include  folder from "C:\OpenCV\install"  directory into "C:\OpenCV" folder and let it replace the previously existing include folder in the directory.

20. Open Code::Blocks and now click on the Settings menu on the menu bar and goto "Compiler and Debugger" settings.

21. Click on the "Linker" tab and "Add" all the files from the folder "C:\OpenCV\lib".


22. Click on the "Search Directory" tab and under "compiler" tab "Add" the path "C:\OpenCV\include" and "C:\OpenCV\include\opencv"


23. Now click on the "linker" and "Add" the path "C:\OpenCV\lib" and hit "OK".


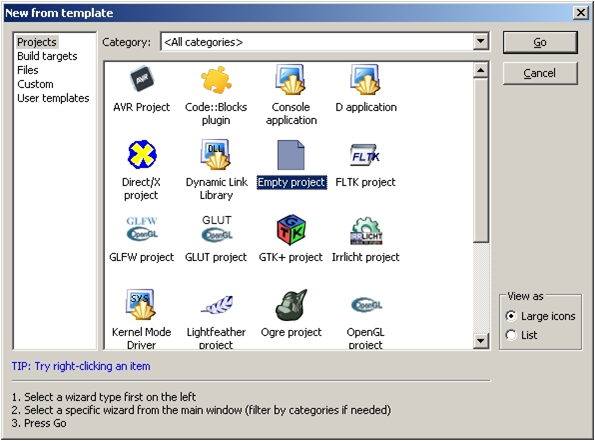
24. Create a new Project. Check "How to create a new project in Code::Blocks".

25. Try to run the following code. This code will load an image of the name "Paris.jpg" onto the screen. You can change the name "Paris.jpg" with your own image name. (Don't forget to putthat image into your project folder).
////////////////////////////////////////////////////////////////////////

#include "stdlib.h"
#include "stdio.h"
#include "math.h"
#include "cv.h"
#include "highgui.h"


int main(int argc, char *argv[])
{
// declare a new IplImage pointer
IplImage* myimage;

// load an image
myimage = cvLoadImage("Paris.jpg",1); //change the file name with your own image

//create a new window & display the image
cvNamedWindow("Smile", CV_WINDOW_AUTOSIZE);
//cvMoveWindow("Smile", 100, 100);
cvShowImage("Smile", myimage);

//wait for key to close the window
cvWaitKey(0);
cvDestroyWindow( "Smile" );
cvReleaseImage( &myimage );
return 0;
}

////////////////////////////////////////////////////////////////////////////

Sunday, February 26, 2012

How to configure Code::Blocks for SDL


To configure Code::Blocks to be used with SDL, follow these steps:


1. If you don't have the Code::Blocks, download the 10.05 version of it with MingW compiler from the link below. 


2. Download SDL headers and binaries (version 1.2.15 for windows) click on the link below and extract them in to your C drive.


3. Install Code::Blocks.

4. Start the Code::Blocks and go to "Compiler and debugger" in "Settings" menu.


5. Go to "Compiler" tab under "Search directory" and click "Add".

 
6. A window will pop-up and in this window click the browse button. 


7. And browse for the "include" folder inside SDL folder which you have extracted in C and hit "OK". By doing so, we are providing the compiler with the path of all the header files which are written for SDL libraries. And now we can include any of the header file, which are present inside this include folder, into our main program.


 8.you will see this window.


9. Now click on the "Linker" tab under "Search directory" and "Add" the path for the linking libraries as follows


10. Now browse for the "lib" folder inside SDL folder which you have extracted in C drive, as shown


11. Hit "OK". Create a new project (File/New/Project..)


12. Give this project a name and select the storage location for your project files. On the next window click "Finish" to create a new project with the specified name.


13. After clicking "Finish" on the next window, your folder which will be storing your all project files will be created. Now all the files which may be required by your program (which you will be writing) must be kept inside this folder.

14. Next do these settings to prevent console window to appear during execution of your program. Go to "Properties" in "Project" menu.


and select the "GUI application"


15. Now go to the "Compiler and debugger" settings menu again and in "Linker Settings" type:

-lmingw32 -lSDLmain -lSDL
under "other linker options".


16. Now your compiler is fully configured to work with SDL.

17. Now as you will be working with SDL, it's DLL files (SDL.dll) will be required by your compiler to execute your program. So you need put those DLL files inside your Folder, which you have just created in step no. 13. You will find these DLL files in C:/SDL/bin. Copy SDL.dll and put it inside your project folder folder_name/bin/debug (created in step 13).

NOTE: This bin/debug folder will be created after you will write your first program and try to run it, running the program will give you an error and then you need to put this DLL file in bin/debug folder inside your project folder.

NOW YOU ARE ALL SET TO ROCK WITH SDL. ENJOY PROGRAMMING WITH SDL :)
A brief description of DLL:

"A Dynamic Link Library (DLL) is a file of code containing functions that can be called from other executable code (either an application or another DLL). Programmers use DLLs to provide code that they can reuse and to parcel out distinct jobs. Unlike an executable (EXE) file, a DLL cannot be directly run. DLLs must be called from other code that is already executing."

To know more about DLL click on the link below:

Friday, February 24, 2012

My First Robot

I was always interested in making something which i could say yeah i have done it. It was started with the robotics workshop i attended in march 2009. After that i was really into robotics. I tried and failed and then tried. At last i was successful in making this robot. Its a wireless robot designed by my team and programmed by me......hehehehehe.... that was  the most interesting thing coz this is the very first robot which was completely programmed and designed by us, that made us feel proud.......

This is how our first robot look like......

Internal view of our robot

Top View

Lateral View

Front view

 
Design by Free WordPress Themes | Bloggerized by Lasantha - Premium Blogger Themes | Affiliate Network Reviews